

The new realm in Voyage of Wonders is coming and it’s called Equilibrium’s Rift and after the last realm wasn’t, frankly spoken, the most challenging one, this one has some more challenges that make it quite entertaining.
This Voyage of Wonders is closed now, please see here the most recent Voyage of Wonders – Frozen Lava.
Equilibrium’s Rift General & Rewards
As always, I won’t spoil anything about the storyline in my guide so you can real through everything, including the walkthrough, without giving away the chance to experience the full realm.

Equilibrium’s Rift is, as the name already tells, a realm with a rift as you might recall from early Peaks of Times. In Equilibrium’s Rift, although, it’s not about past and present, the rift basically mirrors everything.
So, everything you will do on one side of the realm will also happen on the other side, so you will basically start solving the puzzles from both ends.
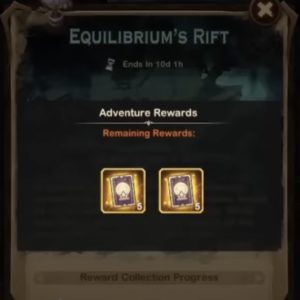
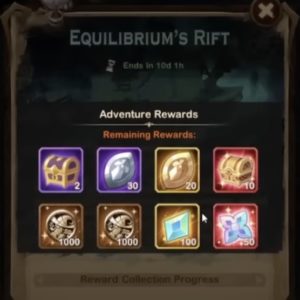
Talking about rewards… the main reward of Equilibrium’s Rift is 10x Stargazing Cards along with emblems, coins and boosters as we see it in the other Voyage of Wonders. I think this is a fair reward looking at the difficulty of Equilibrium’s Rift and that Stargazing Cards Pretty much help every player.
Important! Don’t miss out on the latest gift codes in AK Arena and check back my frequently updated list of active codes here.
Equilibrium’s Rift Walkthrough
As always, you will find a full walkthrough for the realm here. With that being said, let’s not waste any more time and jump right into the walkthrough for Equilibrium’s Rift.
By the way, if you have problems please also check out my bi-weekly updated tier list of heroes (with Signature Item, Artifact, Furniture and Engraving recommendation) here that could give you some hints what heroes are good or maybe also my guide on the best teams in AFK Arena here.
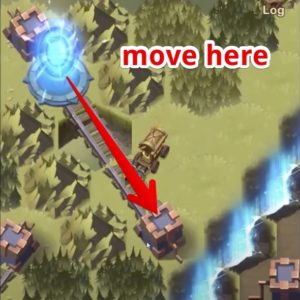
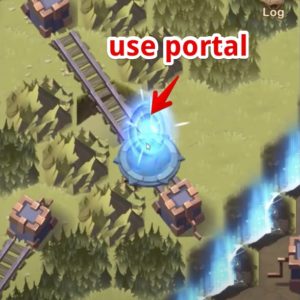
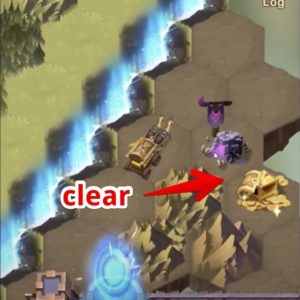
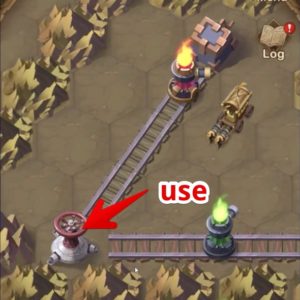
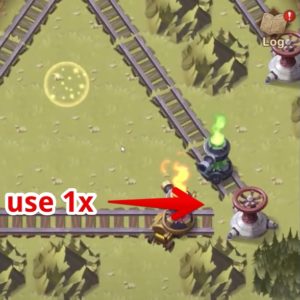
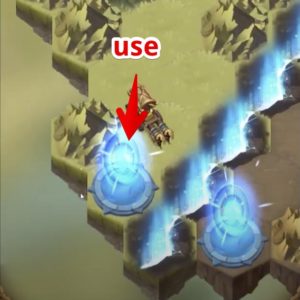
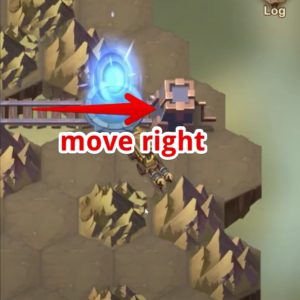
Step 1 – after the short introduction chat between Rowan and Rigby, you need to move the railroad switch with the portal right at the entrance to the bottom right position (1) and then use the portal (2). If not, you will be stuck and have to teleport back. Then clear the camp and Golden Chest on top of the portal (3):
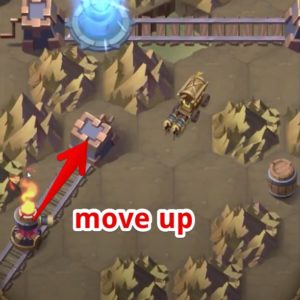
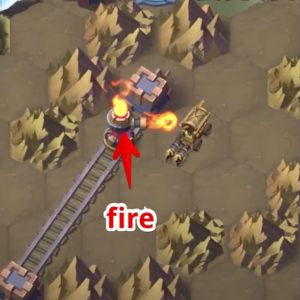
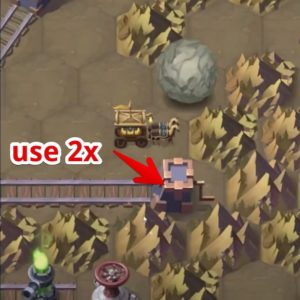
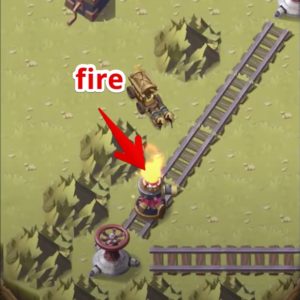
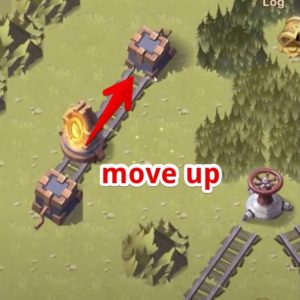
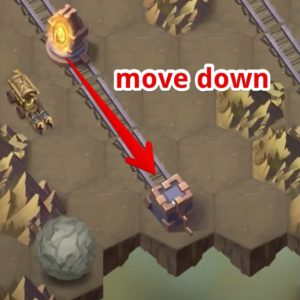
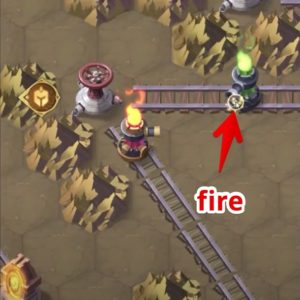
Step 2 – following that path you will come to the next railroad switch with a fire cannon – move it to the top position (1) and then fire it (2) to destroy the barrel on the left side. Then move it to the bottom position (3) and fire it again. This will destroy the barrel on the left side of the Equilibrium’s Rift:
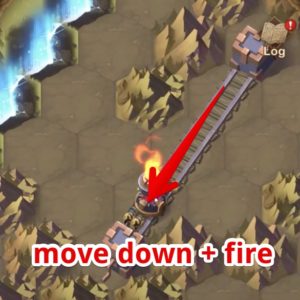
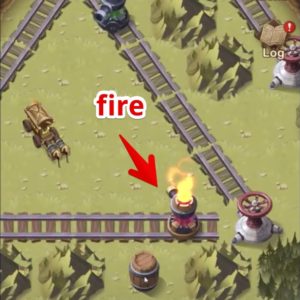
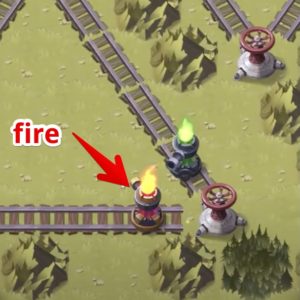
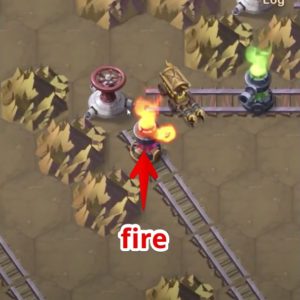
Step 3 – move further down on the map and you will get to the next section with two railroads and here it’s important to use it in the right order to also remove the steamstone on the left side of the rift. So, Use the valve in the middle first (1) before you use the bottom railroad switch (2) two times to move the green cannon to the very left. Then use the green cannon first (3) to hit the steamstone before using the red cannon after.
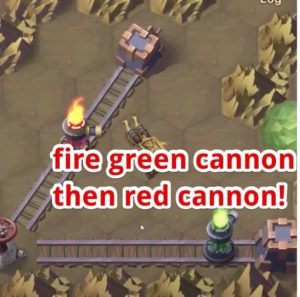
This will destroy the steamstone on the right side of the rift where you are and the one on the left side in a green color.
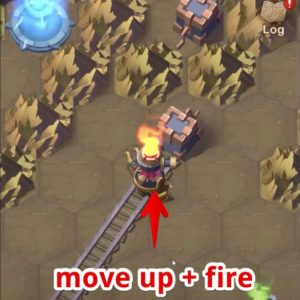
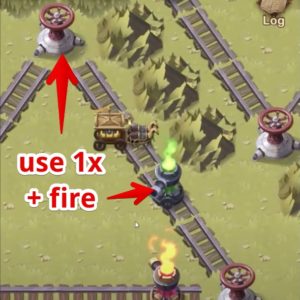
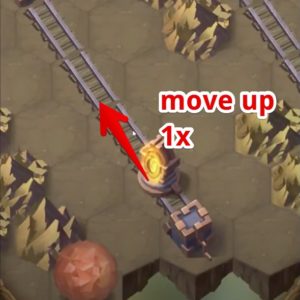
Step 4 – now you can destroy the steamstone on the left side of the Equilibrium’s Rift by moving the red cannon up and fire it (1). Now both steamstones should be removed, please carefully check!

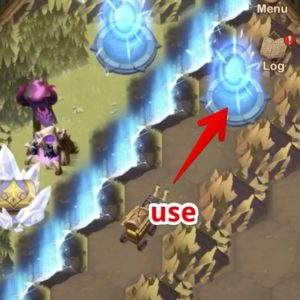
Time to go to the other side again, so use the portal to your right (2) and use the cannon there right away (3) to remove the barrels on both sides of Equilibrium’s Rift.
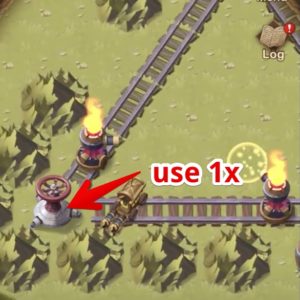
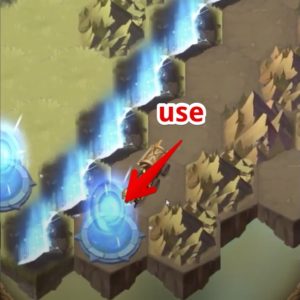
Step 5 – now use the other cannon as well (1) and it will remove the barrels on both sides next to the portals. Then use the valve on the bottom right (2) two times before using the bottom left one (3) one time:

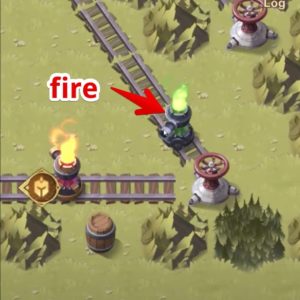
Step 6 – now fire the green cannon (1) two times to remove the barrel and hit the steamstone on the left side of the rift. After that, use the bottom left valve once more (2) to move both cannons in the corner and move the portal on the railroad up (3):
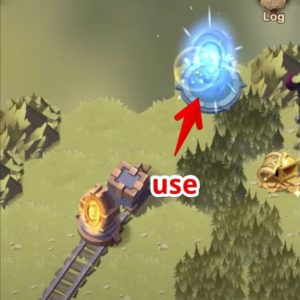
Step 7 – now fire the cannon (1) and it will go through the portal and destroy the other steamstone and you can collect the Golden Chest behind it. Then use the valve (2) one time and fire the green cannon after that in the middle position to destroy the barrel on the right side of the Equilibrium’s Rift. Then you can use the portal (3) at the bottom to go to the right side of the map:
Step 8 – the storyline now continues and then you need to move the portal (1) to the very bottom position before fire the cannon (2) to hit the steamstone. Then move up the portal (3) one time.
As the path is clear now, fire the green cannon (4) to destroy the steamstone and there you can fight the boss camp and pick up the first Crystal Chest (5). Then use the portal (6) and you will be able to pick up the other Crystal Chest.

Step 9 – use the same portal back to the right side after you picked up the second Crystal Chest and pick up the Golden Chest on the right side as well (not in the screenshots). Then use the portal at the bottom to go back to the left side (1). Walk up there and use the portal (2) to get to the right side again. Then walk up and move the portal on the railroad to the very right position (3):
Then take that portal back to the left side and there you can defeat the last two camps and pick up the last two Golden Chests and you have finished Equilibrium’s Rift.
